Lesson |
Handouts/Lessons etc. pts |
Discuss what an animated gif is...
an image encoded in graphics interchange format (GIF),which contains a number of images or frames in a single file and is described by its own graphic control extension. The frames are presented in a specific order in order to convey animation. An animated GIF can loop endlessly or stop after a few sequences.
https://www.animatedimages.org/ is one example... or google search free animated gif's
To make the animated gifs use : https://talltweets.com/
If you get confused look at https://www.ctctube.com/videos.php?watch=5698 to make a gif and
https://www.ctctube.com/videos.php?watch=5699 to export the gif.
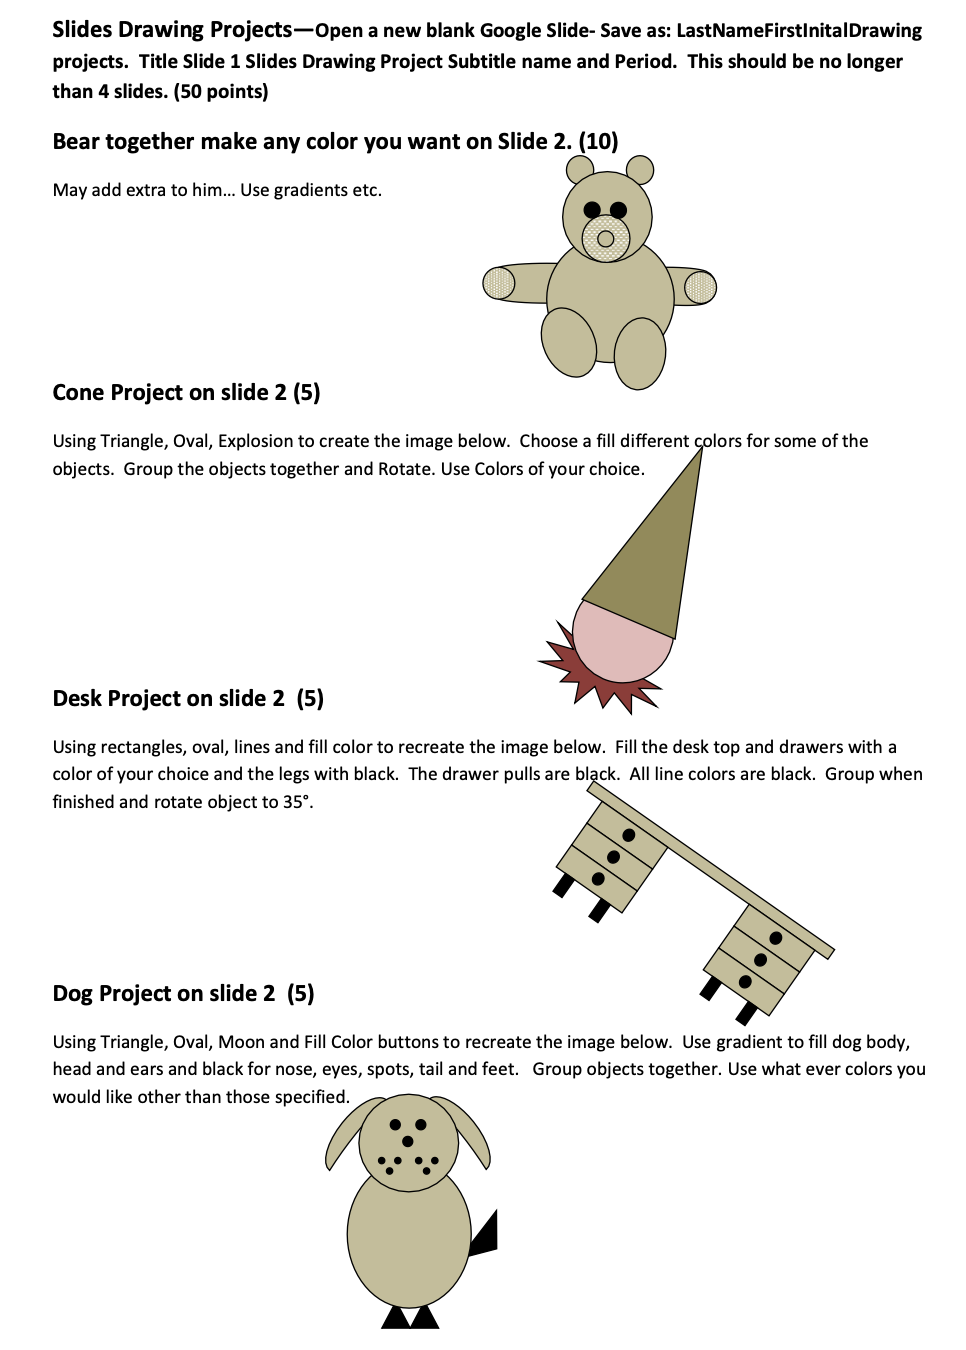
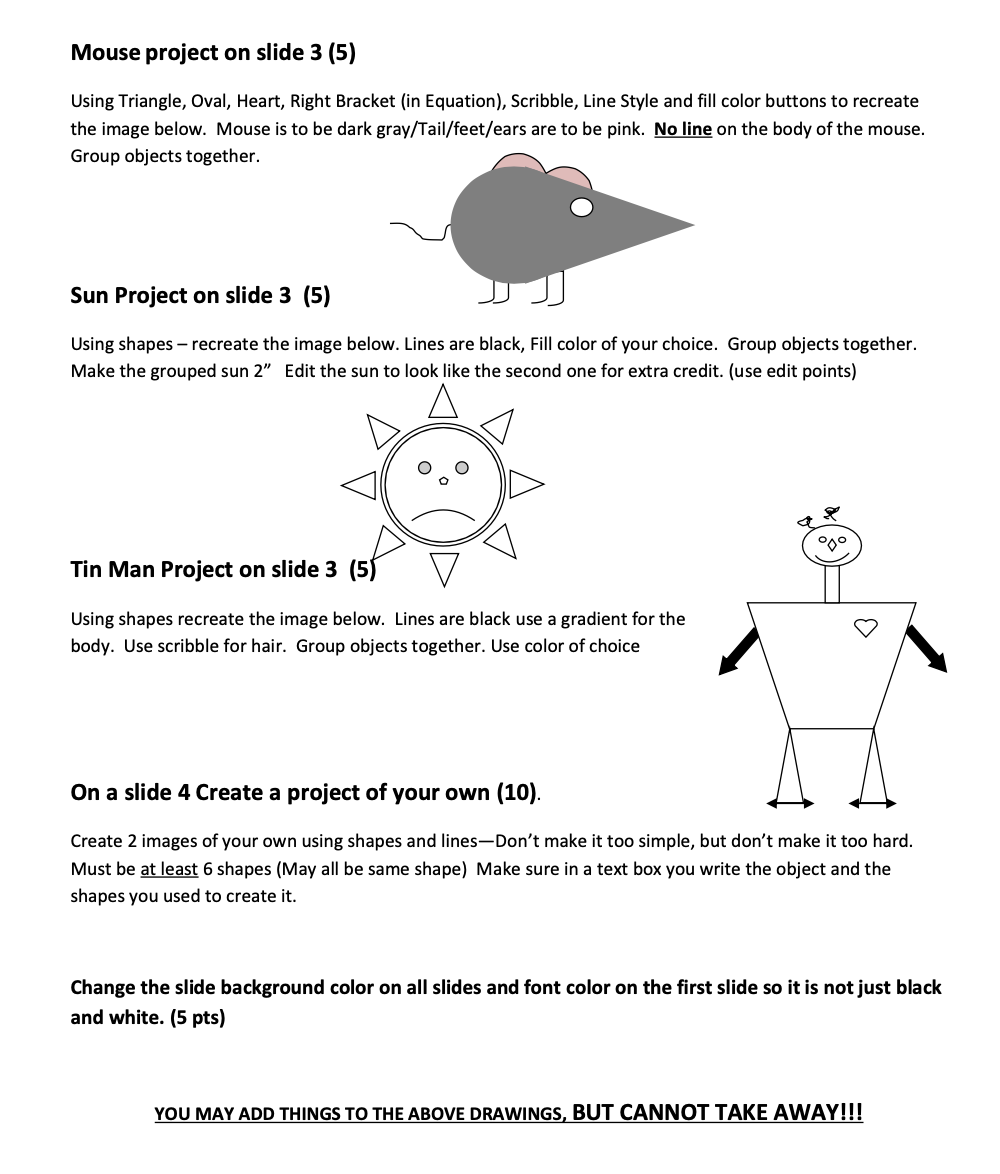
Slide 1- Title Slide (Add Bear Animation Here that we did together or look up on tutorials above) (5)
Slide 2-4 Animated Gif that have animation applied (5)
Slide 3-4 Animated Gif that have animation applied (5)
Slide 4-3-4 Animated Movie/Video GIf's May add Animation (5)
Slide 5- 2 of your own animated Gif's-Each minimum of 3 slides (10 pts)
DO NOT TURN THIS IS UNTIL I TELL YOU TO!!! |
Contact sheet into the handin.... |
Project-BPA Competition PRACTICE (45 points)
Chosen Completed Competition- Find Files under BPA Practice under Shared/DigitalDesign/Semester1.
Print to Lexmark Printer NOT COLOR>Staple in order> Also digitally turn in so I can see the colors WHOLE FOLDER!!!
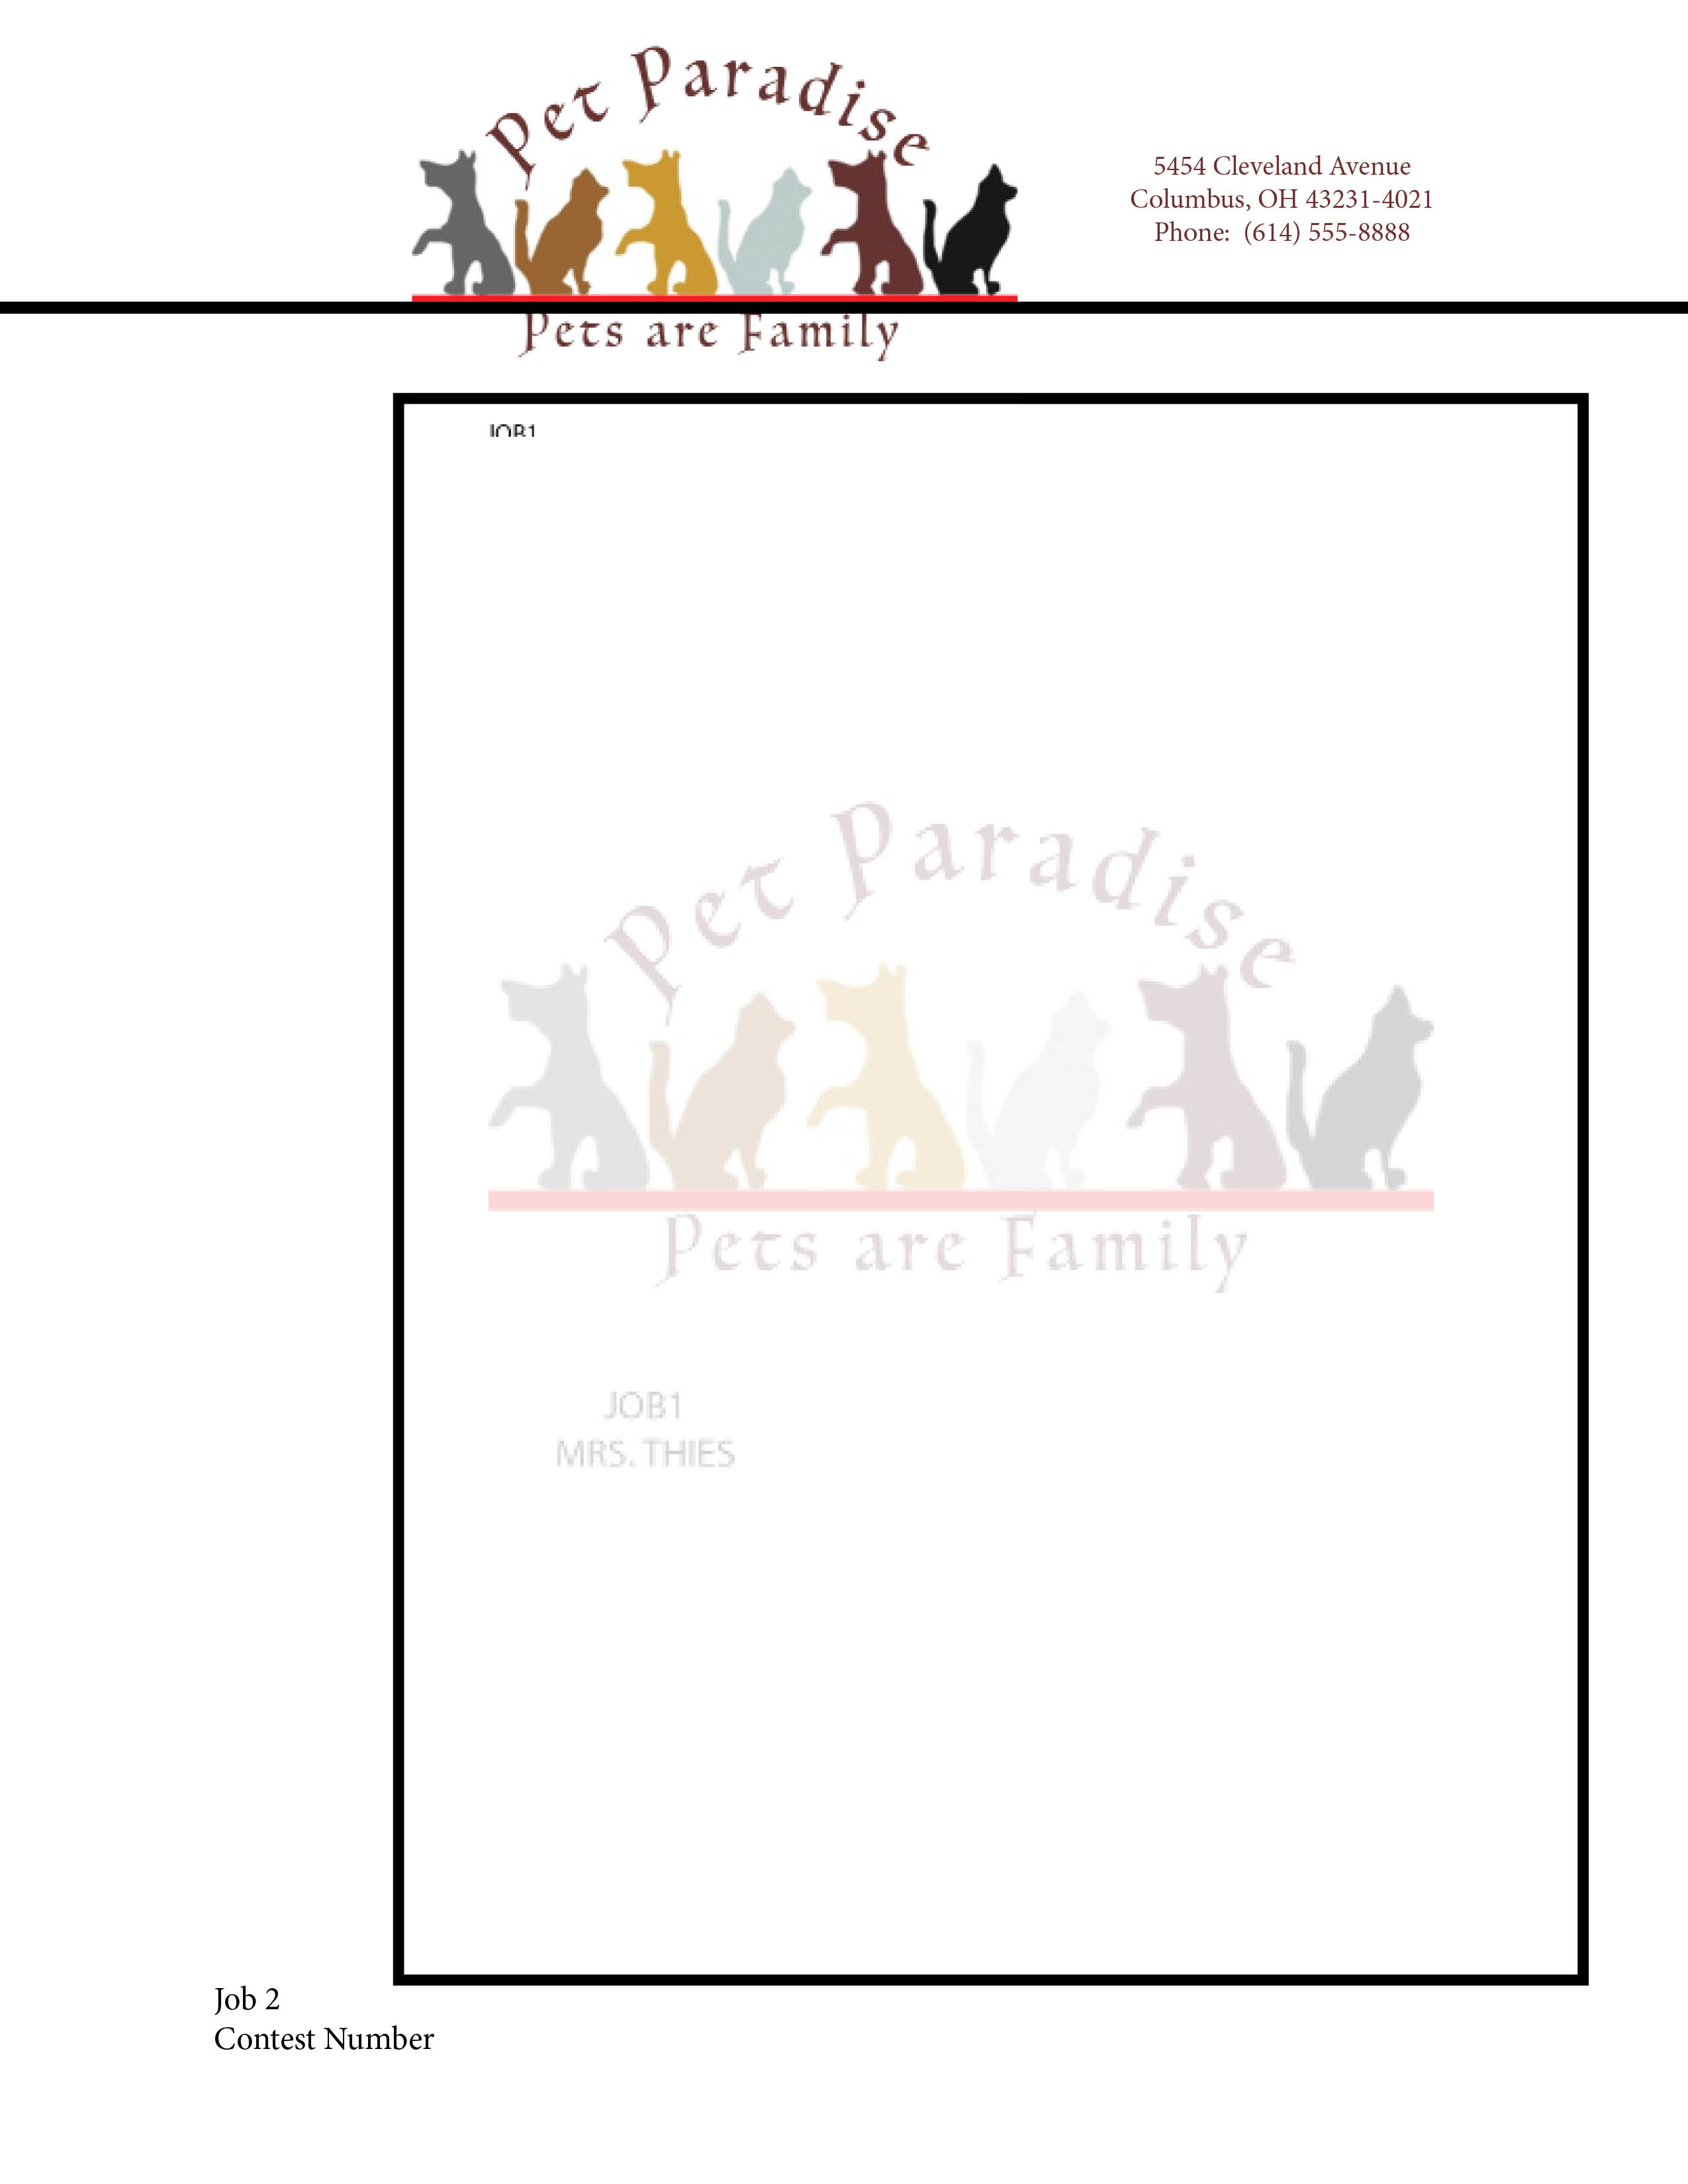
BPA Competition and Examples of completed work : Logo Letterhead Envelope Flyer
|
  |
Principle of Design and Design Elements:
An Introduction 15 points
Watch the following video's:
Show good and bad Logo and Designs and Good and bad Business Cards..
Copy Principles and Elements from Shared/DigitalDesign/Semester 1:
- Open My Business Card.... Design a business card as a Wayne Student:
- Keep Design Principles and Design Elements in Mind...
- Correct all errors and put your name for name in all places... Make sure it is of good design and print Centered with printers marks....
- File>Print>Setup>Options (Centered, Marks and Bleeds>Check Crop Marks and Bleed Marks only
|
|
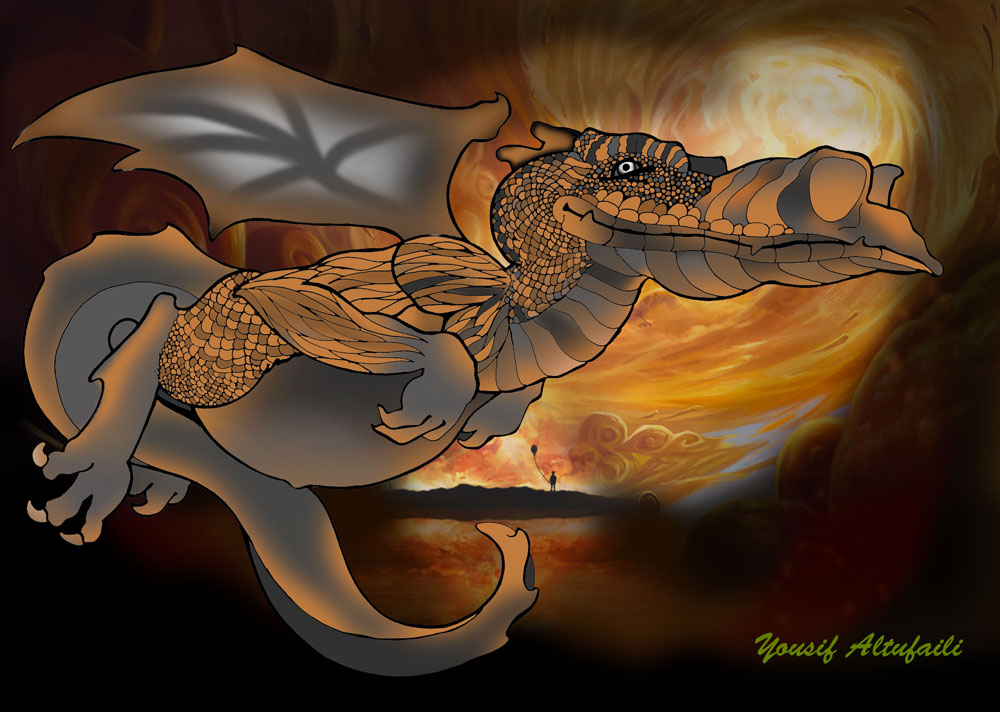
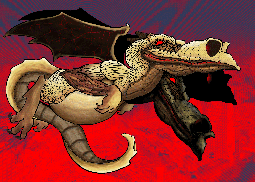
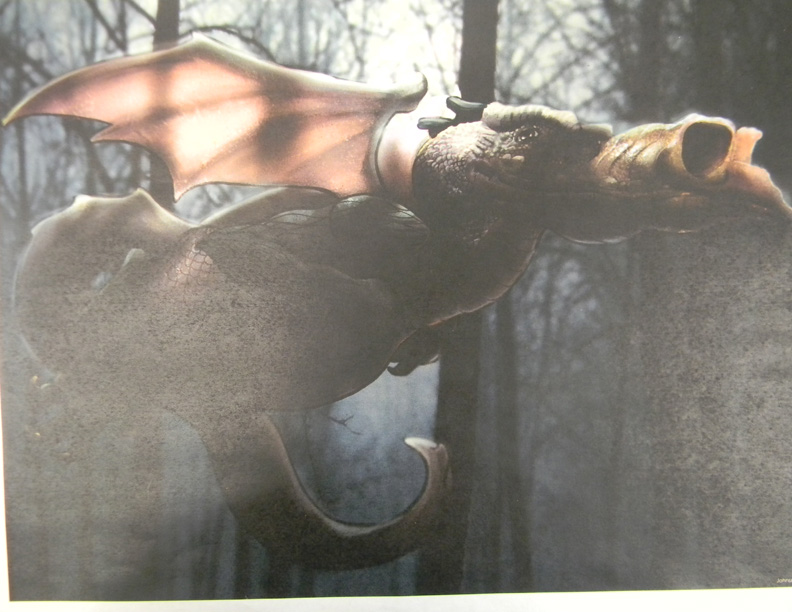
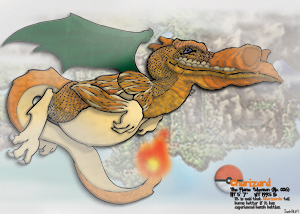
Project: DD-PS-Dragon (100 pts)
Written Rubric for Dragon Project.
The purpose of the Dragon Project is to apply the Photoshop skills learned so far in class. The focus of this project is the skills of creating layers, applying colors, gradients, effects, and texture and other effects to layers. You want to make the dragon appear as 2 or 3 Dimensional as possible.
- Copy the Dragon Project to your area.
- Begin on the outline layer (Duplicate it so you have an original You will hide the original)
- Select a segment(s) on the Dragon (pay attention to tolerance, try 80 or 100
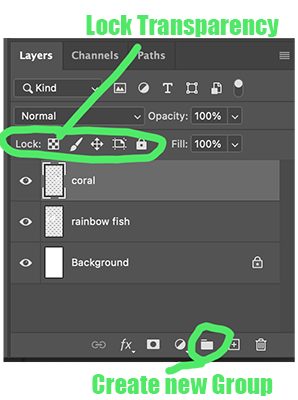
- Layer> new layer via copy, name it with the body part. Make sure you also make use of groups (folders)
- Make sure you lock transparency if necessary.
- Apply color and texture effects as appropriate
- After you have colored the dragon, add shading, highlights or shadows using masking etc… see video.
- Make an appropriate background, may use a high quality image, however you must edit it so that it has been transformed enough that it appears original.
- Put name at bottom right corner. Make this part of the art not standard font.
- Print to color printer (Fit it to page) with this copy below it. If in class...
Videos to help:
Grading:
- Overall look of the Dragon – visual appeal (does it have depth via gradients and effects/textures…do not overuse the blending options—NOT FLAT) does the dragon look whole Dragon should not have white (40)
- Use of layers. Minimum of 45 layers – proper naming/put into folders (Checked on screen) (10)
- Added Shading/shadow highlights/transparency…etc. used to add depth as well. (10)
- Created Appropriate background using brushes and effects… (15)
- Time—Adequate Amount of time spent on Project (10)
- Name put neatly in bottom right corner in appropriate size, color and font. (5)
- Saved as Last Name FIrst Initial Dragon--Put a copy in correct Hand in folder on the Network- Print to Color Printer (10)
|


|
Assignment: DD-PS-Brushes Picture (15 pts)
Create a New Photoshop Document>For Print Landscape (11" x 8.5")
Save as: Brushes Picture Lastname First Initial
Download brusheezy.com Video how to:
- Make a Picture of something using at least 3 Different Brushes. Use at least 5 of them.
- Make sure each brush is on its own layer so that you can more easily edit it. Make sure it has a background ex. Halloween Scene, City Scene, House Scene, Farm, Mountain etc.
- Add an effect on at least one item....
- Put your name and period in lower right corner> and turn into the Handin Folder.
|

|
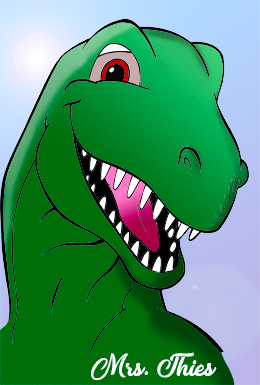
Bellringer 6-DD-PS-Dino Bellringer
Bellringer6 Day 1: Copy Bellringer6 Dino off the Server, Apply Shading:
Bellringer6 Day 2: Open Bellringer6 Dino, Apply Highlights and Applying a Lens Flare
Bellringer6Day 3: Watch and apply this video (effects)>
- Also change Dino image size to 800 px wide (Let height change on own. Go to Image>Image Size> Width 800.
- Type your name on the dinosaur.
Save Bellringer 6 and turn into Handin (10 pts)
DO NOT DO THE ONES BELOW>...
Bellringer6 Day 4: Watch How to manipulate brushes. Go to Brusheezy.com
Bellringer6 Day 5: Watch: How to download and install Brushes from Brushezzy
|
 |
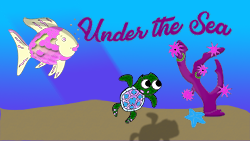
Assignment: DD-PS-Coloring Underthesea.psd (25 points)
Copy DD-PS-Coloring_Brush_Pattern onto your desktop.
- Rename DD-Coloring underthesea.psd by adding your lastname firstinital to the end.
- Open DD-Coloring underthesea.psd
- Change Canvas Size to inverse of what it is (Edit>Canvas Size> 1920 wide x 1080 height)
- Create Groups (Bottom of layers panel click on the folder>Create a new Group) one for coral, one fish
- Coloring>Selecting parts of Coral and putting them on separate layers> Select right click>layer via copy or Layer>New>Layer via Copy
- Lock Transparency> Click on the transparency.
- Creating a Gradient> Coral and Fish Color both (Link all your layers inside the group)
- Make a new group>Turtle
- Bring in Turtle from the turtle file, anyone you want>
- Make a pattern> In Pattern Folder Open Turtle_Skin. Edit>Define Pattern
- Apply pattern>
- Apply another pattern somewhere.
- Color the turtle
- Make background watery.. Gradient... texture... Example
- Add Sand to bottom > Paint some sand on a sand layer>make a smart filter, add noise or filter gallary>Film Grain
- Add effects to SOME layers.. Feel 2 dimensional.
- Shading (Black) or highlights (white)>Make own layer in each object> Make a selection (ex. Rainbow Fish CMD+Click on thumbnail) Use black to add shading (You can adjust flow and opacity, You will want the highlight/shade on top of all layers of that object)
- Add a Title Under the Sea warped and large in a unique font.
- When complete put name and Period in lower right corner> Save>
- EXTRA CREDIT> add a shadow, or Add another sea life item for the Sea, color use gradients, shading, patterns and effects (up to +5 points)
- Save this and put into appropriate handin folder.
|
This is an example... It may not be complete, or may have different items than asked for. |
Assignment- Intro to Coloring November Coloring.psd
Finish November Coloring... Put into Handin....
|
 |
Typography Collage (40 Points)
Create a collage using the magazine supplied in class or at home.
Make a collage of magazine ads/newspaper ads/ etc. that use effective font to portray their message (must have at least 12 cut out). Must be various effects and fonts. (drop shadow, gradient, outline, bold, italic, kerning/tracking etc. ornamental, serif, san serif etc.). Then answer the following about each of your cutouts. You may answer none if there is no evidence of one. May do up to 3 more for up to +6 Extra Credit.
- Are serif or sans serif, scrip or would you classify them as ornamental?
- Tell me any other typography items you notice (leading, tracking, baseline shift, scaling, etc)
- What case are they? Lower case, uppercase, title case, Sentence Case
- Color? Gradient? Bold? Italics?
- Any Effects? Stroke, glow, Drop Shadow etc
Write or type the information for each.
See instructions attached. |
40 points
|
INDD- Assignment-Bookwork
- Open Bookwork folder for the following: ID 2-1, ID 2-7, ID 2-8, Min Pin together- Change Christopher Smith to Your Name> If absent...2-8 thru 2-19>
- Do page 2-34 (Add your name after July 4, 1776) Follow instructions
- Do page 2-35 Replace Christopher Smith with your name follow instructions)-
Print to Lexmark printer and Staple all 3 in order and turn into the tray. |
15 Points |
Assignment- Typography
Pass out Typography Terms- Worksheet here
Define using this site and for 19 and 20 Measure Font, OTF TTF > I will check off tomorrow> Quiz Next Thursday 11/3> Kahoot Wednesday
- Copy DD-IndesignTypography - Complete DD-Character Panel and DD-Typography Anatomy.indd- Filling in correct words for parts. Print to Lexmark and turn in>Play the Kerning Game (15 points)
- Complete DD-Type Quote Practice.indd (Should look like the quote when done- Pick a Color of your choice> Similar fonts to the example- Use the Character Panel. Type your Name and Period in Lower Right Corner> Print and turn into Tray. (10 points)
QUIZ Over this....
Watch Video on Typography |
|
Assignment: DD-PS-Photography2 (part 2)
- Together: Color adjustment Paris Streets
- Hold down Command then click Kids layer to select the kids
- Add adjustment layer to them only, get the color to match background. Try different adjustments, (photo filter very helpful)
- Color adjustment1 Put yourself in this picture and edit colors to match image.
- Color adjustment2 Put yourself in this picture and edit colors to match image.
- Spot of Color: Open Spot1... Either watch video or We will do it together.
- Spot2- Same effect... Pick one Flamingo to keep incolor
- Spot3- Image of your own to add a spot of color.
- Spot4- Image of your own to add a spot of color.
Create a contact Sheet> File>Automate>Contact Sheet II> Route to Folder> Change Columns to 2 Rows to 4> Pick the 7 files above Type your name>Save as AdjustSpotLastname FirstInitial. Put into the appropriate handin folder.
|
VIdeo on Color Adjustments
Video on How to do Spot Color
You need 7 Images on Your Contact sheet .. See instructions! PUT THIS INTO YOUR PERIODS HANDIN FOLDER |
Quarter 2 Above this line |
End QUARTER 1 Grades |
Bell Ringers4: DD-PS-Bellringer4
- Copy Bellringer4 to your desktop (under the shared folder)
- Open Mask1 Adobe watch- Layer masks :Save as Mask 1.psd
- Open Mask2 (adobe) and Mask2b (adobe)- Apply Layer Mask Tutorial Save as Mask 2.psd
- Open Redeye-Cloning- Apply Redeye tutorial 0-2:00 1st day,
- Cloning 2nd day 2:00 until end. Save as: Redeye-Cloning.psd
Print a contact Sheet> File>Automate>Contact Sheet II> Route to Folder> Pick your files>Change Columns to 2 Rows to 3> Type your name> Print to Lexmark Printer
|
|
Assignment: DD-PS-Photography2
Color Correction: Using Adjustment Layers
- Watch this video: Women and woods. Then add text with effect and warped behind the Women, Watch and add lens flare: Save as: Effects1.psd
- Next, Cut yourself out apply (Stroke and glow) effects to you, Change color and blending mode of a background of your choosing. Add your Text, maybe your name, warped and with some effect... Have fun with it!!! Save as: Effects2.
- Extra credit: Make another of a famous person using the same skills, their name etc... save as: Effects3
- .... Create a Contact Sheet of Effect 1-3 a 2x2 Save as EffectsLastnane First initial and put into the correct period hand in.
|
 |
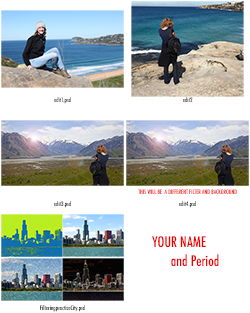
Assignment: DD-PS-Photography1 DD
Copy folder from Server\Shared\1DD\Semester1 Folder- Called Photography1.
Save all files into the Photography 1 DD Folder
- Open the City, Make each Layer a smart Object (Filter >Convert for smart Layers)
- Apply a filter of your choosing to each of the images. Name each Make sure they are different.
- Create a new document Landscape- Put 4 pictures of the same in this document... Similar to the city... Apply a filter to you on each layer...
- Open NonEdit1: Together crop using Rule of Thirds,
- Have someone take a picture of you, maybe in the middle of the hall or in the room, Apply a Rule of Thirds to your picture then apply a blur to background so it appears as if you changed the aperture. Save as edit2.
- Lastly, download 2 pictures of a landscape you like, cut yourself out and put yourself in using rule of thirds and apply a filter to the background. Save these edit3 and edit4.
Turn in: Make a Contact sheet of the editedCity, your self filters and 4 edited images 2 columns, 3 or 4 rows Type your name and period Print> Contact sheet example is missing self and different rows and columns. You do not have to turn into google classroom
|
 |
Digital Design Quiz over Photography
Kahoot for practice
Look at the simulations
Notes |
|
Project: DD-PS-Nameplate Masking

Rubric and Instructions here |
 |
Bell Ringers3: DD-PS-Bellringer3
Advanced Selecting Techniques>
Talk about Bellringer: Copy from Wayne Server>Shared>1-DigitalDesign>Semester 1
PS-Bellringer
0:00 – Introduction
0:42 Quickly Remove Backgrounds with Select Subject
1:51 Change the Color of Anything with Select Color Range
3:58 Cut Out Hair with Select and Mask
9:07 Precisely Trace Any Edge with the Pen Tool
13:38 Cut Out Clouds with Channels (Use this as your background)
When done we will make a contact Sheet of these. 2 columns 3 rows- with filenames (my example)
Type your name and period on the empty clouds in a font and size with good contrast...Turn in by Printing. |
 |
Assignment: DD-PS-Sports Masking
HINT: On a Mask Layer-White Reveals, Black Hides
Show how to set up Sports -- Add your last name first initial to the sports file before opening. Assignment: https://www.ctctube.com/videos.php?watch=5895&HD=1
Students will pull Wrap the Cleat and the Football already included: https://www.ctctube.com/videos.php?watch=5896&HD=1
Students will remove background on all items and place into the Sports.psd file. Will have at least 8 items when completed. Make sure each layer is named in the Sports.psd file.
Steps to successful wrapping:
Step 1: Place the image in a location that you can have the item wrap in front of and behind.
Step 2: Duplicate the Layer
Step 3: Move the Layer Copy to the bottom in the layers panel.
Step 4: On the original top layer (the one without the word Copy), add a Layer mask
Step 5: Using a Black Paint brush paint on the mask to hide part of the image that you would like to wrap.
Grading:
- Colored Background
- Effect on Text
- Properly wrap all 8 items... Make sure you have something in front and something behind... Make sure it makes sense.
When you are done turn into the period appropriate Hand in Folder
Turn in >File>Browse and submit |
 |
Bellringer 2- DD-PS-Bellringer2
- Put this into Google Classroom
|
 |
Assignment: DD-PS-Rooms
Folder: DD-PS-Rooms
Open: PS-Room1
Magic Wand (Removing WhiteBackground): https://www.ctctube.com/videos.php?watch=5868&HD=1
Spot Healing Brush: https://www.ctctube.com/videos.php?watch=5867&HD=1
Color Picker and Paint Bucket: https://www.ctctube.com/videos.php?watch=5869&HD=1
When you are done you should have a bed with a lamp on a nightstand, a picture on a new colored wall... and if you want new colored floors and Carpet... Resize and position things so they feel complete. Put in a plant for +1 Extra credit... not the one from the Bellringer
Save
Open: PS-Room2
- Paint Bucket and Blending Mode: Change the color of this room. https://www.ctctube.com/videos.php?watch=5849&HD=1
- Select and Get Rid of White in the most appropriate desk to put into room and Chair
- Transform the carpet and the picture on a side wall to look appropriate. Edit>Transform> Distort or
perspective
- Add at least another 2 more items to the room. (computer, plant, sofa, etc.)
Save
Open: PS-Room 3
- Make this any type of Room you want. Bedroom, Gameroom, Living room etc.
- Add at 10 items to the room (Can be large items (ex Sofa), or small items (ex blanket/Pilows).
- Must have at least one thing on wall and a carpet of some sort.
- Must Paint the room, or at least wallpaper one wall.
- Make sure things are transformed correctly.
Save
To Turn in...
PRINT ALL ON ONE SHEET
Create a contact sheet 2 rows and 2 columns
Type your name at the bottom right corner. Print and turn in.
|
Example of Room 1
|
Assignment: DD-Intro to Smart Object
New file: SmartObjectLastnamefirstinitial
Learn Today: Intro to Smart Object
Lesson on Smart Object:
|
 |
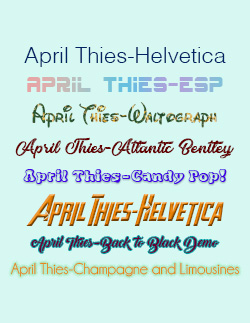
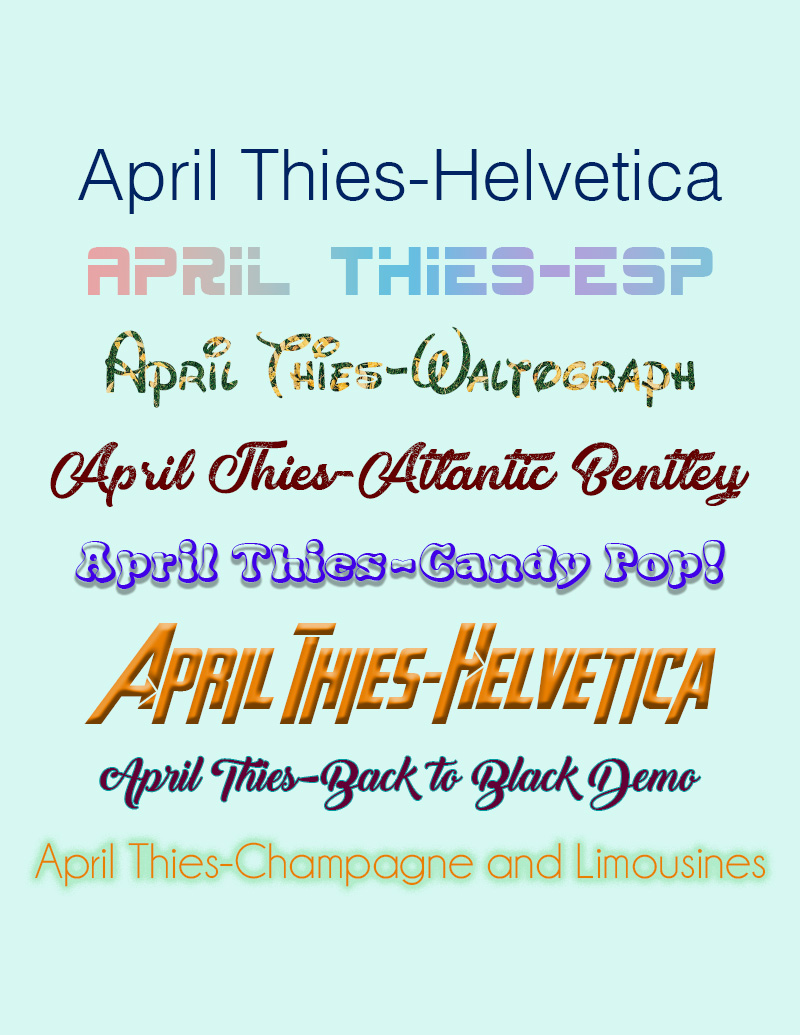
PS-Fonts
Open Fonts and the Dafonts file.
Install the fonts supplied...How to download and install from dafont
Downlaod and install 5 fonts of your choosing
Create the document to the right using your name and your fonts.
Grading:
- Top one is standard fonts, second and third are ones supplied the other 5 are of your choosing
- Change color of the fonts
- Add an effect to each
- Change your background color
- Align the Lines
Turn into the handin Folder |
 |
Bell Ringers1: DD-PS-Bellringer1
Talk about Bellringer: Copy from Wayne Server>Shared>1-DigitalDesign>Semester 1
PS-Bellringer1
|
 |
| |
|
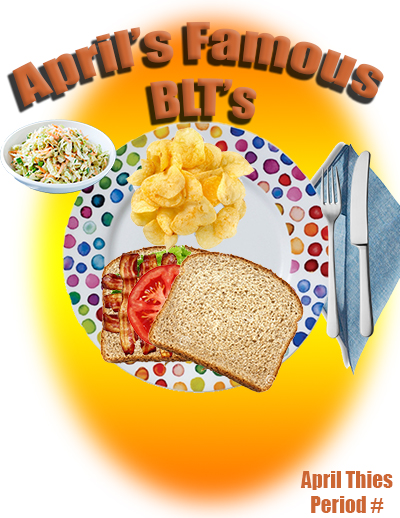
Assignment: PS-BLT Sandwich Selecting
New File: Print 8.5" x 11"- SandwichLastnameFirstInitial
Using selecting tools and move tool in the Sandwich file create a BLT... Also add a plate, napkin and other items to the document... Type your name and Period.
How to start your BLT Sandwich.
Helpful hints for creating a good BLT Poster...
Grading will be based upon:
*Complete BLT with 2 Slices of Bread and I can see all layers (Hang top piece off to side)
*Plate, Napkin and at least two Side items
*Named Layers
*Name Catchy Phrase and Period added with effect
*No background is showing on items
* A Vignette with gradient feathered background.
When done Put into appropriate class... Handin3 or Handin5, |
Example:
|
Assignment-DD-Composition-1
Terms: Workspace, Tools, Layer, selecting tools (magic wand, quick selection, object selection, polygonal, lasso, magnetic lasso) Tolerance
File>New>Print>Letter Size> Save as: Composition-1 LastNameFIrst Initial
Learn the Magic Wand, move all items in the magic Wand folder into the Composition-1 file without their backgrounds,
Learn Quick Selection tool and Object Selection Tool - Move all items from the PS Quick and Object Selection folder into the Composition-1 file withouut thier backgrounds.
Learn the Polygonal and Lasso and Magnetic Selection, move all items in the Polygonal/magnetic orfolder into the Composition-1 file without their backgrounds.
Add 3 items of your choosing... Choose from your already downloaded files in Filemanagment.
Add your name Large> Use warp>Different Font>Effect...
* A Vignette with gradient feathered background.
Using the Type Tool adding warp and effects
When done Put into appropriate class... Handin3 or Handin5,
FYI- Example may not have all items or have different items...
|
Example: May have different images See final number in instructions.
|
-->
Assignment: Drawing
How to Create simple drawings in Google Slides,
We will do the following in Google Slides.... Open From Classroom... We will do Bear together.
Terms to learn.... Selection, stacking order, stroke weight, rotation, gradient,
Tutorials below are to show you how to do things. You will create all the drawings on the attached pdf:)
Shapes and Lines https://www.ctctube.com/videos.php?watch=5596
Colors and Gradients https://www.ctctube.com/videos.php?watch=5597
Layering, Aligning https://www.ctctube.com/videos.php?watch=5598
When you are done you will turn them into the Google Classroom. |
Drawing Projects2020 Slides
|
Assignment: File Managment
Turn in file into Handin3 or Handin5 Which ever period you are in. |
|
History of Computer Notes Worksheet and Binary and Memory Worksheet
Complete Pictures that are on the worksheet- Print to Lexmark Printer. This is the B/W Printer. It should print to one page.
|
10 pts |
Beginning of year
Student Information Form and Sign off of Bell Schedule and online Expectations.
Fill out Student Info Sheet
Make sure Tech Prep Application is filled out if you do not have a tartan ID or have never signed up for Sinclair. This does not make you commited to anything it just allows you to have the benifits of Tech Prep. Here is a direct Link to the Application: MV Tech Prep Application
Link to Tech Prep Website
|
10 points for filling out Student information and MV tech prep Application (You just get 5 points if you already did it in the past:) |
QUARTER 2--test |
Extra Credit: 2" x 6" Winter Valentine Dance Ticket
Filename: Lastname first initial Winter Dance Ticket 2022
Theme: Valentines Day
Date: Saturday February 5th, 2022
Time: 7pm-10pm
Place: Wayne High School Cafeteria
Bring Student ID's |
 |
Project-BPA Competition PRACTICE (25 points)
Chosen Completed Competition- Find Files under BPA Practice under Shared/DigitalDesign/Semester1
Example of Jobs 1,3 and 4 |
|
|
|
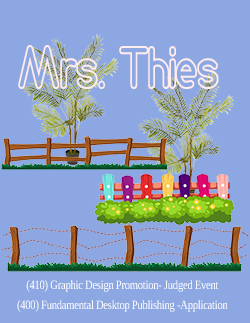
Assignment: Autobiography Practice Brochure (15 pts)
Copy from Shared folder- DD-IND-Autobiography Practice
Front Page
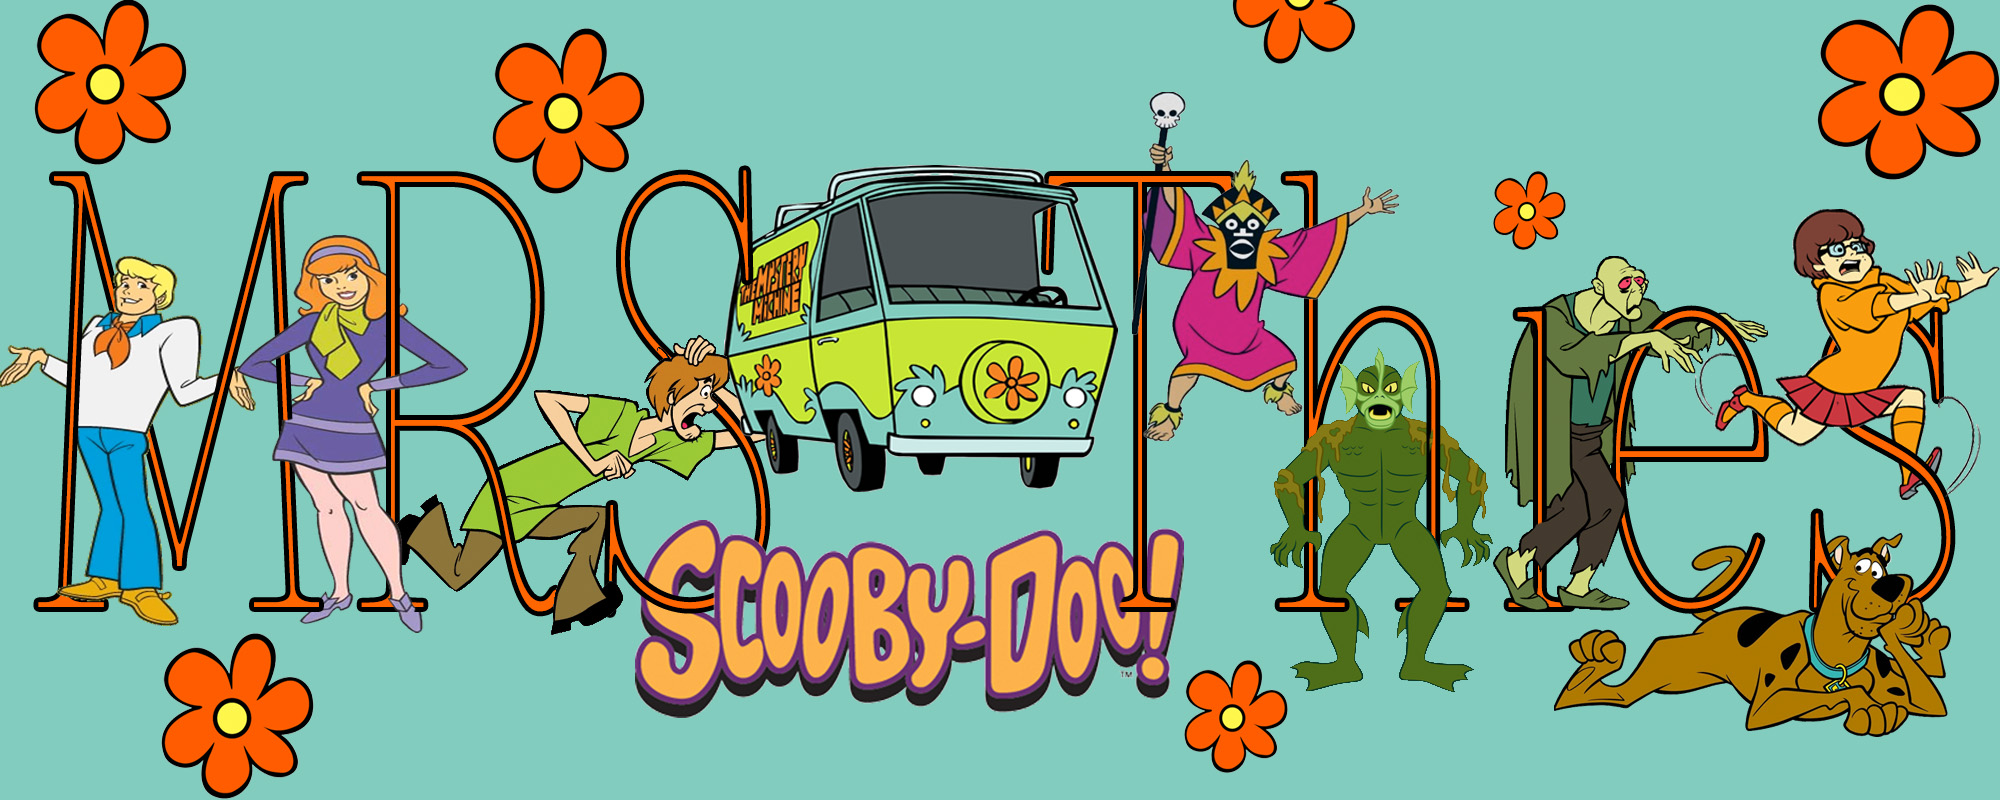
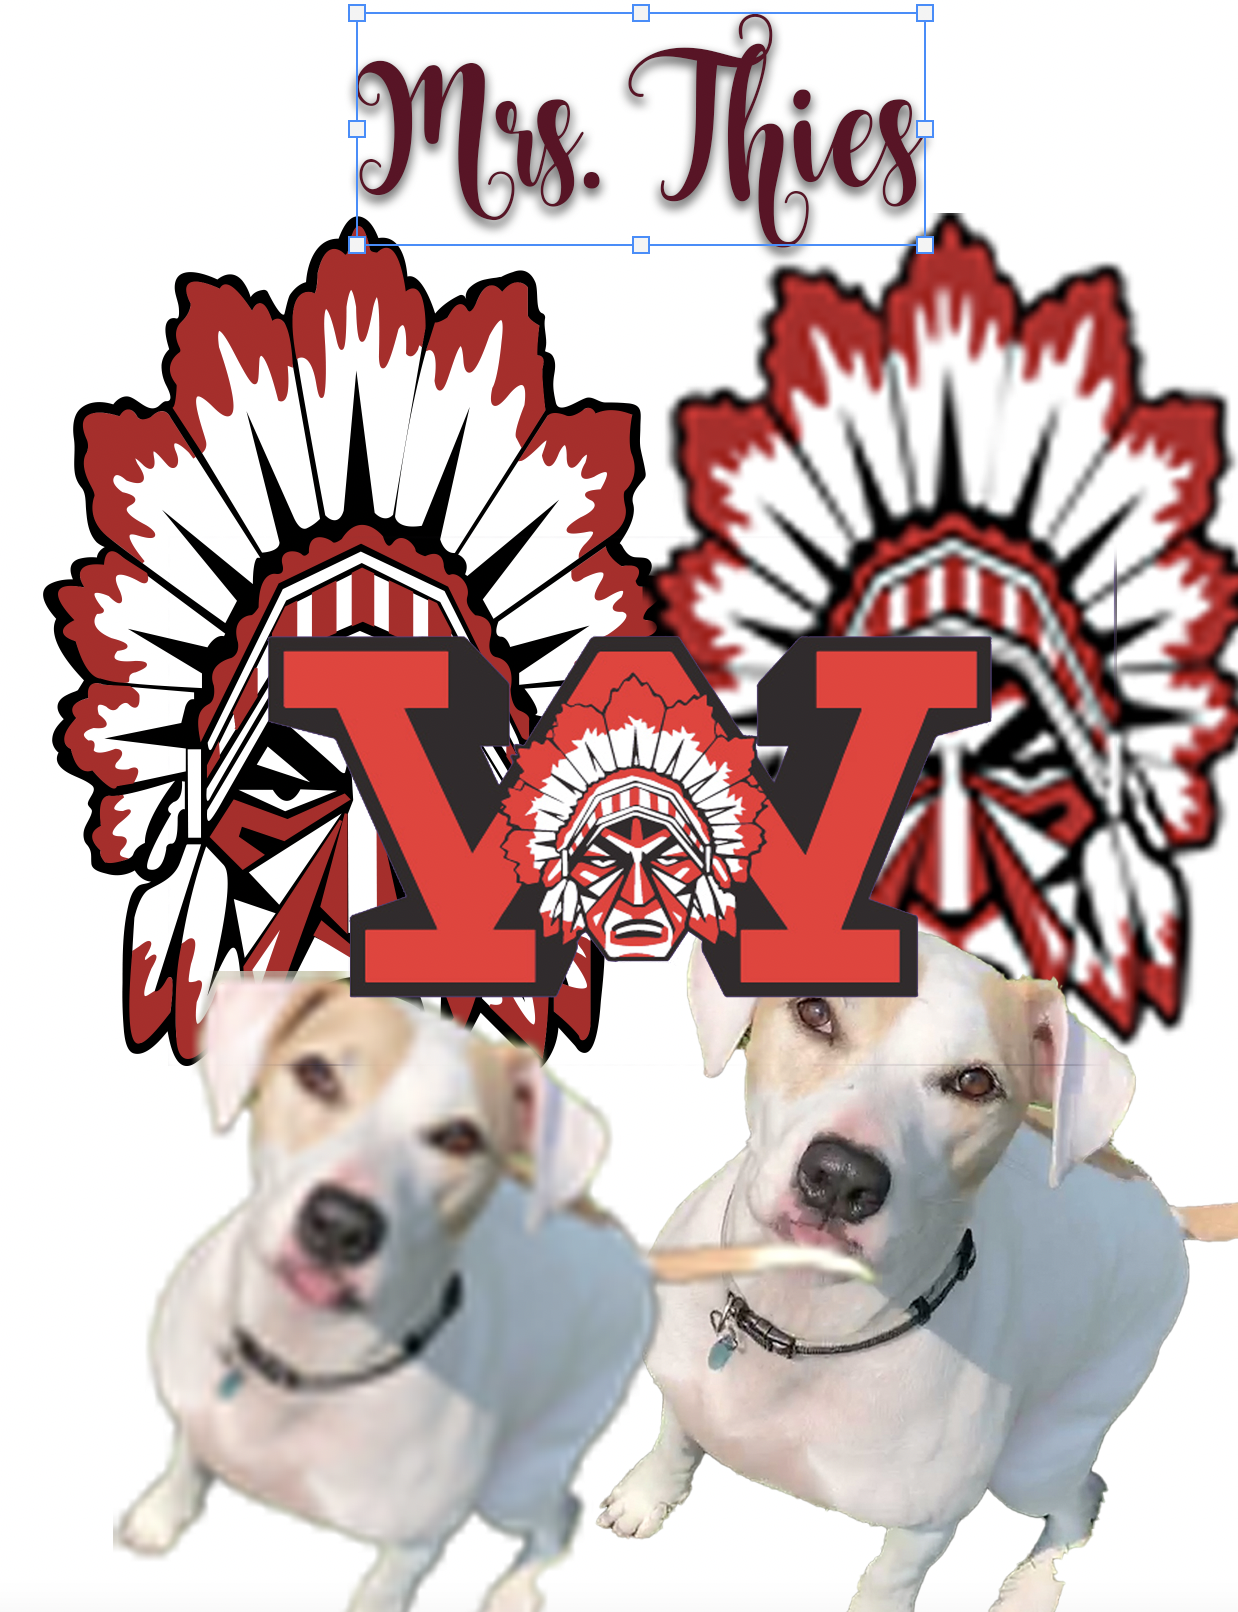
- Place picture Thies Family to front of brochure between Life and Time of and Mrs. Thies
Expand the picture margin to margin
- Change Mrs. Thies to Your name
- Apply Paragraph Style Heading to these 2 text boxes… expand the boxes if necessary
- Make the Title Life and Times have closer leading (decrease the leading) –
- Apply a fitting to both Text boxes
- Apply Paragraph Style Subheading to Mrs. Thies
- Edit the subheading Style so that it is centered, make the rule below indent .5” on left and right, change the style and color if you want.
Inside Page
- Apply Paragraph Style Subheading to both subheading sections
- Apply Paragraph Style Heading to the Heading
- Text Wrap the picture of the girl, soccerball and word soccer, make sure they have and offset of at least .06
- Change the shape of the 2 kids to be something other than Rectangle
- Fit all text boxes inside of margins
- Make the Heading have a colored background
|
|
Bellringer 7- IND-Type
Copy Bellringer 6 Folder from Shared>Digital Design>Semester 1 Folder
Turn in by Submitting PDF into the google classroom.
|
|
Assignment: Lyrics Poster
Assignment Lyric Poster
35 Points
Indesign-Standard Sheet 8.5" x 11" Margin 1/4" (.25) Bleed 1/8” (.125)
Choose one of your favorite line/s from a song (needs to be minimum 7 words) and illustrate it using only typography (you may use Simple shapes and glyphs). Consider how the font, color, sizes and placement of the typography can reflect or emphasize the meaning of the words. Check out the posters at for ideas and inspiration. (Please site the artist and song somewhere---Also put your name and year you graduate neatly and small in bottom corner (Within the margin).)
Lyric Poster
- Correct Song Lyrics, (minimum 7 words) (3)
- Used Type/Glyphs/Simple shapes effective choices and color (NO FULL PAGE COLORING-White Background ONLY)(10)
- Use of Character/Paragraph Panel evident (Tracking, Kerning, Scaling etc) (5)
- Site Song and Artist appropriately (2)
- Site Your name and Your Year of Graduation appropriately (2)
- Time, Creativity, Use of Design Principles: Balance, Proximity, Alignment, Contrast and Space (Takes up whole page) (10)
- Saved as PDF and turned into Google Classroom, then Printed to Printer and turned in (Nothing cuts off..Including name) (3)
When done put the PDF ONLY copy in the google classroom and turn in the printed copy. |
`
 |
Assignment-Quote Practice (Typography Folder)
25 points
Open the DD_Type QUote PRacitce and make the layout look like the example that is included in the documcnet.... You must create a color swatch of your choice (DO NOT USE THE DEFAULTS I WILL COUNT OFF)
- Make sure you add the shapes and lines.
- Notice this is all Sans Serif Fonts
- Add the Glyphs of your choosing beside not> I used ones inside of Wingdings
- Future and tomorrow are Taller and have no fill with a stroke of your colorr
When complete Export this as a PDF>
FIle>Export> Adobe PDF for Print> Add your first name to the beginning of the filename- )Example: AprilDD-Type Quote Practice.pdf
Put into Google Classroom |
 |
Bookwork-DD-Indesign
Set 1- Indesign Chapter 2
- Together pages 2-8-2-19 (Min-Pin Intro) Change Christopher Smith to Your Name. (+5 Extra Credit)
- Page 2-34 (Add your name after or Before July 4, 1776)
- Page 2-35 (Replace Christopher Smith with your name)
Print both and Staple all 3 in order and turn into the tray...
Set 2- Chapter 2
- Together (if absent on own)Page 2-20 thru 2-25 Save as Diner Change Jake to your name.
- Page 2-32- Save as Toy Breeds Put name by the subtitle after Dog Breeds.
Print Both and Staple both together with diner on top and turn into tray |
|
LEARN-Terms Typography
Pass out Typography Terms> Define using this site and for 21 and 22 Measure Font, OTF TTF > I will check off tomorrow> Quiz Friday> Kahoot Thursday
- Copy DD-IndesignTypography - Complete DD-Character Panel and DD-Typography Anatomy.indd- Filling in correct words for parts. Print to Lexmark and turn in>Play the Kerning Game
- Complete DD-Type Quote Practice.indd (Should look like the quote when done- Pick a Color of your choice> Similar fonts to the example- Use the Character Panel. Type your Name and Period in Lower Right Corner> Print and turn into Tray.
Watch Video on Typography
Watch Video on Typography |
|
Bellringer 6- Indesign-Type
Copy Bellringer 6 Folder from Shared>Digital Design>Semester 1 Folder
|
|
DD-Tutorials 1- PS-Pop Out/ Retro 3DTutorial (25 points)
(Similar to TikTok Logo)
- 3D-Tutorial- 3D-Guy Do the tutorial 3D1 and then do one of yourself (the picture we took of you crop to a near head shot- Put your Name in Photoshop on it and apply the tutorial to both Yourself and to the words Save this as 3D2..(3d effect on Text)
Save as: LastnameFirstInitial 3D1.
Save as: LastnameFirstInitial 3D2.
Save as: LastnameFirstInitial 3D3... Extra Credit
- Pop out Tutorials-Folder-Do the picture they provide name this file Popout1...then do one of your own...Find a picture that is an action shot..name this Popout2. > Must add text of some sort to #2. You may do a #3 one for extra credit.
Pop Out Tutorial 2 - Football Guy Image
Save as: LastnameFirstInitial Popout1.
Save as: LastnameFirstInitial Popout2.
Save as: LastnameFirstInitial Popout3... Extra Credit
... Print a Contact Sheet of these tutorials 2 by 3, make sure layers are on. I want popout ones together and 3d ones together with Filenames (Correctly doing the contact sheet is 5 points)- Type your name in lower right corner. Print to Color Printer and turn in.
|

|
Mini-Project: DD-PS-Pumpkin Coloring
Open Pumpking Coloring... Start coloring by removing white background and creating a sky layer and a grass layer. Then begin coloring the items on the page.
- Select portions w/Magic Wand (mess with tolerance I don't want white fringe)
- Layer via copy
- Name new Layer, possibly lock transparancy of that layer.
- Color with Paintbucket, paintbrush or Gradient tool.
Helpful Tutorials:
What you must include: At least 3 gradients, at least 2 patterns (maybe on hat and moon or pumpkin), 2 other effects. Nothing left white, Happy Halloween behind the pumpkin warped with effects and halloween font, add 2 more Halloween items to the image and color. Name in lower right corner with period> Export as a jpg and put into google classroom.
|
|
QUARTER 1
|
END QUARTER 1 |
|
Assignment: DD-PS-Photography1 DD
Save all files into the Photography 1 DD Folder
- Open the City, Make each Layer a smart Object (Filter >Convert for smart Layers)
- Apply a filter of your chooosing to each of the images. Name each Make sure they are different.
- Create a new document Landscape- Put 4 pictures of the same in this document... Similar to the city... Apply a filter to you on each layer...
- Open NonEdit1: Together crop using Rule of Thirds,
- Have someone take a picture of you, maybe in the middle of the hall or in the room, Apply a Rule of Thirds to your picture then apply a blur to background so it appears as if you changed the aperture. Save as edit2.
- Lastly, download 2 pictures of a landscape you like, cut yourself out and put yourself in using rule of thirds and apply a filter to the background. Save these edit3 and edit4.
Turn in: Make a Contact sheet of the editedCity, your self filters and 4 edited images 2 columns, 4 rows Type your name and period Print> Contact sheet example is missing self and different rows and columns. You do not have to turn into google classroom
|
 |
Assignment: DD-PS-Sports Masking
HINT: On a Mask Layer-White Reveals, Black Hides
Show how to set up Sports Assignment: https://www.ctctube.com/videos.php?watch=5895&HD=1
Students will pull Wrap the Cleat and the Football already included: https://www.ctctube.com/videos.php?watch=5896&HD=1
Students will remove background on all items and place into the Sports.psd file. Will have at least 8 items when completed. Make sure each layer is named in the Sports.psd file.
Steps to successful wrapping:
Step 1: Place the image in a location that you can have the item wrap in front of and behind.
Step 2: Duplicate the Layer
Step 3: Move the Layer Copy to the bottom in the layers panel.
Step 4: On the original top layer (the one without the word Copy), add a Layer mask
Step 5: Using a Black Paint brush paint on the mask to hide part of the image that you would like to wrap.
When you are done turn into the Google Classroom
Turn in >File>Browse and submit
|
|
Bell Ringers1: DD-PS-Bellringer1
Talk about Bellringer: Copy from Wayne Server>Shared>1-DigitalDesign>Semester 1
PS-Bellringer1
|
|
Assignment: DD-PS-Rooms
Folder: DD-PS-Rooms
Open: PS-Room1
Magic Wand (Removing WhiteBackground): https://www.ctctube.com/videos.php?watch=5868&HD=1
Spot Healing Brush: https://www.ctctube.com/videos.php?watch=5867&HD=1
Color Picker and Paint Bucket: https://www.ctctube.com/videos.php?watch=5869&HD=1
When you are done you should have a bed with a lamp on a nightstand, a picture on a new colored wall... and if you want new colored floors and Carpet... Resize and position things so they feel complete. Put in a plant for +1 Extra credit
Save
Open: PS-Room2
- Paint Bucket and Blending Mode: Change the color of this room. https://www.ctctube.com/videos.php?watch=5849&HD=1
- Select and Get Rid of White in the most appropriate desk to put into room and Chair
- Transform the carpet and the picture on a side wall to look appropriate. Edit>Transform> Distort or
perspective
- Add at least another 2 more items to the room. (computer, plant, sofa, etc.)
Save
Open: PS-Room 3
- Make this any type of Room you want. Bedroom, Gameroom, Living room etc.
- Add at 10 items to the room (Can be large items (ex Sofa), or small items (ex blanket/Pilows).
- Must have at least one thing on wall and a carpet of some sort.
- Must Paint the room, or at least wallpaper one wall.
- Make sure things are transformed correctly.
Save
To Turn in...
PRINT ALL ON ONE SHEET
Create a contact sheet 2 rows and 2 colums
Type your name at the bottom right corner. Print and turn in.
|
Example of Room 1
|
Assignment: DD-Intro to Smart Object
New file: LastnamefirstinitialSmartObject
Learn Today: Intro to Smart Object
Lesson on Smart Object:
|
|
Assignment: PS-BLT Sandwich Selecting
New File: LastnameFirstInitialSandwich
BLT Sandwich- Students will Create a BLT usig Selecting skills and Text
Using selecting tools and move tool in the Sandwich file create a BLT... Also add a plate, napkin and other items to the document... Type your name and Period.
If you you miss class watch
Photoshop getting started with BLT,
Part 2 BLT
Finding Google images:
Adding and Subtracting from selections:
Magic Wand and Tolerance:
Magnetic LassoTool:
Grading will be based upon:
*Complete BLT with 2 Slices of Bread and I can see all layers (Hang top piece off to side)
*Plate, Napkin and at least two Side items
*Named Layers
*Name Catchy Phrase and Period added with effect
*No background is showing on items
* A Vignette with gradient feathered background.
When done Put into appropriate class... Handin3 or Handin5, |
Example:
|
| |
|
Introduction to Design: What is Graphic Design: https://vimeo.com/10532686
Design Principles
http://maddisondesigns.com/2009/03/the-5-basic-principles-of-design/
Design Elements
http://www.unahealydesign.com/elements-of-good-graphic-design/
|
|
|


